Fresh flavour within arm’s reach. The calm of a daily check-in. The small, quiet thrill of seeing new leaves appear. A windowsill herb garden brings all of this — and a pinch of mint in your tea, a handful of basil on pasta, or a sprig of thyme sizzling in a pan — into even the smallest home.
This guide walks you from seed to first harvest with simple, trustworthy steps. We’ll cover coir prep, sowing depth, watering, and when to make that first cut.
Why Start a Windowsill Herb Garden?
Windowsill herbs are compact, affordable, and wonderfully rewarding. Caring for a small pot adds a gentle rhythm to your day, and you learn by doing — no garden, greenhouse, or specialist kit required.
If you’re choosing where to start, these six herbs behave beautifully indoors:
- Basil: fast, fragrant and loves warmth
- Parsley: patient and generous once established
- Chives: hardy, cut-and-come-again classic
- Mint: resilient and forgiving; keep it in its own pot
- Thyme: aromatic, compact and drought-tolerant
- Coriander: quick to leaf; sow little and often
Materials and Prep: Coir and Containers
Choosing Pots and Drainage
Herbs prefer pots with drainage holes and matching saucers. For single herbs, 12–15 cm pots work well; for mixed sowings, a 20–30 cm window box is ideal.
Drainage matters more than depth — roots dislike sitting in water. On a sunny sill, lighter-coloured pots help avoid overheating; on a shadier sill, darker ones hold a touch more warmth.
Light and Placement
South or west-facing sills suit sun-lovers like basil and thyme. East-facing sills suit parsley, mint and coriander. North-facing sills can still work with reflective surfaces and attentive care.
Rotate pots every few days for even growth, and move heat-sensitive herbs 5–10 cm back from glass at noon in summer.
Why Use Coir?
Coir, or coconut fibre, is clean, peat-free and holds water evenly, making it excellent for seedlings.
The coir supplied in kits and sold in garden centres has usually been heat-treated, compressed or granulated, and has calcium added during processing. This means it is a ready-to-use, sustainable growing medium straight from the pack — no complicated pH balancing or buffering needed.
It is naturally lower in nutrients than multi-purpose compost, which means you are in full control of feeding from the start. It also resists compaction, helping roots breathe freely.
How to Hydrate Your Coir Brick
Always follow the specific instructions printed on your product’s packaging, as water quantities and expansion times vary depending on the format and moisture level of the coir.
As a general guide:
- Place your coir brick or block in a bucket or large bowl.
- Add warm water gradually, following the pack guidance.
- Leave to swell fully — usually 10–15 minutes — then break up any clumps and fluff by hand.
- A well-hydrated handful should hold together when squeezed and fall apart gently when tapped — moist, not dripping.
Adding Nutrition
Blend in an organic slow-release fertiliser at the label’s rate — typically 1–2 tablespoons per 5 litres. For extra airiness, fold in a handful of perlite or fine grit per litre of mix. Fill pots to 1–2 cm below the rim and firm lightly, not tightly.
Note: Raw, unprocessed coir — the rough, wool-like fibre occasionally sold for specialist use — does require buffering before use, as it contains higher levels of potassium and sodium that can interfere with plant nutrition.
To buffer raw coir, mix in a teaspoon of garden lime per 5 litres, or blend 1 part peat-free compost into 3 parts coir. If you are unsure which type you have, check the packaging. Treated coir will state that it is ready to use or pre-buffered.
Sowing Herbs from Seed
Sowing depth is where many first-timers overthink things. Use this simple rule:
| Herb | Sowing Depth |
|---|---|
| Basil, thyme, mint | Surface or 1–2 mm — press lightly |
| Parsley, chives | 3–5 mm |
| Coriander | 5–8 mm — sow as is; no crushing needed for fresh seeds |
Moisten the surface with a fine mister or by bottom-watering before you sow. Aim to sow more thinly than feels right — it is kinder on seedlings and saves thinning work later.
Label and date every pot; it keeps you patient and proud when the first shoots appear.
Best Timing for Indoor Herb Seeds
Basil and thyme love warmth, around 18–24°C, and can be grown indoors year-round. Coriander prefers cooler spells, so spring and autumn are ideal to prevent bolting.
Parsley is a slow starter and can take 2–4 weeks to germinate, so be patient and trust the process.
A Note on Coriander Seeds
Fresh coriander seeds can be sown whole, exactly as they are — no crushing required. If you are working with older seeds that have been stored for a while, soaking them in water for a few hours before sowing can help speed up germination.
Thinning and Transplanting
Once seedlings show their first true leaves — the second set that actually resembles the adult plant — thin crowded patches with small scissors or gently ease extras into a new pot.
Always handle seedlings by the leaves, never the stem, and transplant when root tips are just beginning to knit together. Basil and coriander can also be grown thickly for cut-and-come-again leaves without transplanting at all.
Watering and Moisture Management
Seedlings love moisture, not saturation. The method matters as much as the frequency.
Bottom-Watering for Seedlings
Bottom-watering means placing your pots into a shallow tray filled with 1–2 cm of water and leaving them for 10–15 minutes. The compost draws up exactly the moisture it needs from below, through the drainage holes in the base of the pot.
Remove the pots and allow them to drain once the surface feels evenly moist. This keeps leaves dry, encourages roots to grow downward, and significantly reduces damping-off — the seedling collapse caused by excess surface moisture.
Top-Watering for Established Herbs
Water slowly at the surface until a little trickles into the saucer, then tip out any standing water after a few minutes. This thorough but occasional approach builds deeper, stronger roots.
How Often Should You Water Windowsill Herbs?
Check daily by pressing a finger 1–2 cm into the surface. Coir can look dry on top before it is dry beneath, so judge by feel and by lifting the pot — it will feel noticeably lighter when it needs water.
In bright, warm spots you may water every 1–2 days; in lower light, every 3–5 days.
What to Watch For
- Droopy leaves that perk up quickly after watering usually mean the plant is slightly under-watered.
- Limp stems, yellowing leaves, a musty smell and persistently wet medium usually mean over-watering.
When in doubt, wait a day and check again. Your herbs will forgive you.
Light, Feeding and Basic Herb Care
Light by Herb Type
- Full sun, 5–6+ hours: basil, thyme and chives
- Part sun or bright indirect light, 3–5 hours: parsley, coriander and mint
In winter, move herbs closer to the glass to catch lower light. A small LED grow strip on a 12–14 hour timer makes a real difference through the darker months.
Keep leaves away from cold draughts and hot radiators. Steady conditions suit herbs far better than fluctuating ones.
Feeding Schedule
Because coir is lower in nutrients, start a gentle balanced liquid feed once seedlings show their first true leaves. Use at quarter to half strength.
Feed weekly for fast growers like basil and coriander, and fortnightly for thyme, parsley, mint and chives.
Once a month, water through with plain water to flush any salt build-up. If you mixed in slow-release fertiliser at potting, begin liquid feeding a little later — when growth slows or leaves pale slightly.
Simple Weekly Herb Care Routine
- Rotate pots for even growth.
- Pinch basil tips to encourage branching.
- Snip any flowers on coriander and mint, as flowers mean fewer leaves.
- Brush thyme gently with your hand to keep it compact and release its scent.
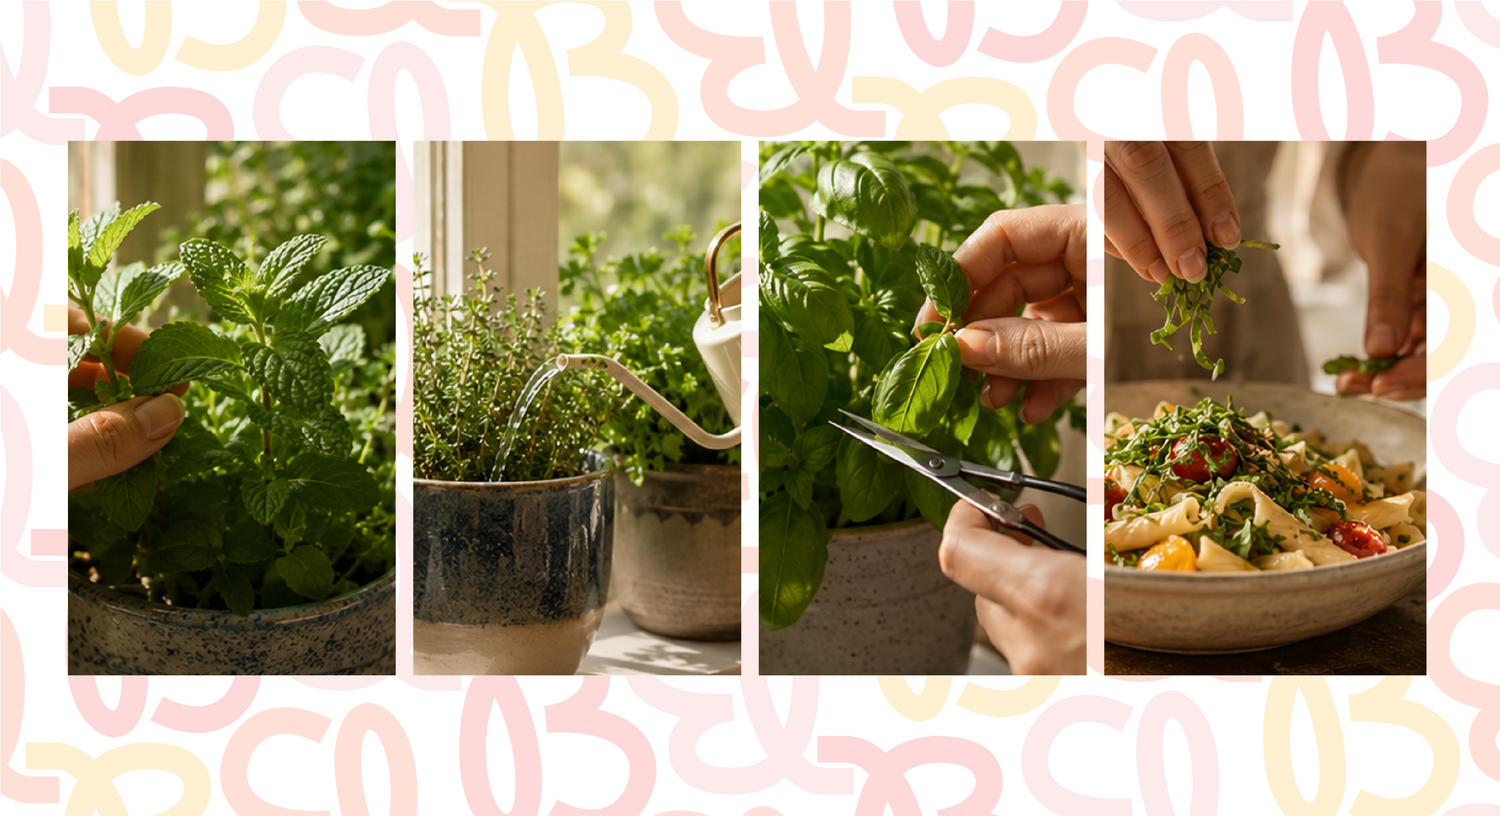
First Harvest and Ongoing Cropping
As soon as plants have 4–6 true leaves and look healthy, it is time to start harvesting. Begin lightly — a leaf or two per plant — then build up to small handfuls every few days as growth accelerates.
How to Harvest Each Herb
- Basil: pinch or snip just above a pair of leaves; two new shoots will replace every tip you take.
- Parsley: cut outer stems low at the base; leave the central crown to keep producing.
- Chives: snip 2–3 cm above the soil; whole clumps regrow cleanly.
- Mint: take soft tips above a leaf pair to keep plants bushy.
- Thyme: clip non-woody tips; avoid cutting into old, brown stems.
- Coriander: either harvest whole young plants, or cut outer stems and leave the centre to regrow.
The golden rule is to take no more than a third of any plant at once. Stagger your picking across plants so each has time to bounce back.
How to Store Fresh Herbs
Wrap damp, not wet, sprigs in paper towel and refrigerate for a few days. Basil prefers room temperature — stand stems in a small jar of water like flowers, covered loosely.
For longer keeping, chop and freeze herbs in olive oil in an ice-cube tray, make a quick herb butter, or hang small bundles of thyme to dry in a warm, airy spot.
Troubleshooting Windowsill Herbs
Damping-Off
If seedlings collapse at the base, sow thinly, use bottom-watering, improve airflow, and always use fresh coir and clean pots. Prevention is far easier than cure.
Yellowing Leaves
Yellowing leaves are most often a sign of over-watering or hungry plants. Let the medium dry a little more between waterings and introduce a gentle feed if you have not already.
Leggy, Weak Stems
Leggy stems usually mean not enough light. Move herbs to a brighter sill, rotate pots more often, and pinch tips to encourage branching. A grow light in winter resolves most legginess quickly.
Small Flies Around Pots
If you notice small flies hovering around your pots, the most likely cause is compost that stays too wet for too long.
Allow the top layer to dry out between waterings, switch to bottom-watering consistently, remove dead leaves from the surface, and add a thin layer of horticultural sand on top to deter them.
Slow or Patchy Germination
Parsley and coriander can be unhurried. Keep moisture even, be patient, and try a staggered second sowing a week later to extend your harvest window.
A Quick Experiment Worth Trying
Sow basil into two small pots: one with plain hydrated coir, and one with the same coir plus a pinch of slow-release feed.
Keep light and watering identical. Start half-strength liquid feeding both after the first true leaves appear, then watch. Most growers see a noticeable difference in colour and pace — a simple, satisfying lesson in why feeding coir gently and consistently matters.
A Thoughtful Gift, Beautifully Packaged
A windowsill herb kit makes a genuinely useful, genuinely joyful gift. It invites someone to slow down, get their hands into something real, and feel the small thrill of a first harvest.
Look for curated seed collections with premium packaging, pre-measured coir, biodegradable pots, markers, and a beginner-friendly guide — with the option to personalise a message for birthdays, thank-yous, or new-home moments.
You are not just giving seeds. You are giving someone permission to grow something, and the quiet confidence to know they can.